Hello my lovely people! 😍
Hare Krishna to everyone. On this auspicious festival of Janmashtami may Lord Krishna give you all the things you need in life. Every year I use to celebrate this festival of birth of Lord Krishna. In the night we use to give Jhula to Krishna.
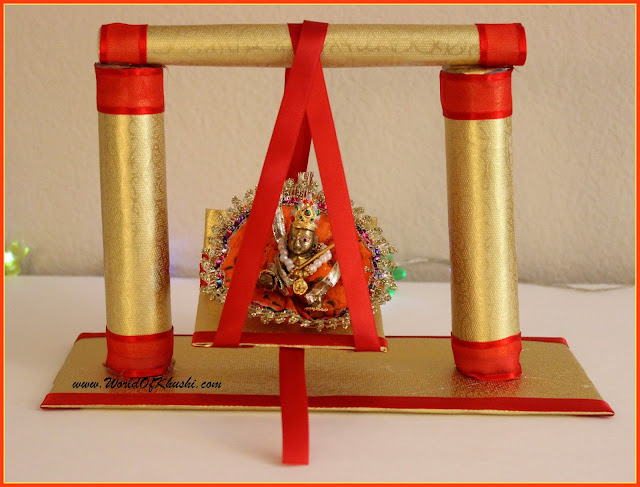
This year I have tried something special with that idea. I thought why not make a Jhula for Bal Gopal at home. Thus came up with Today's post which is a DIY Krishna Jhula. This is my version of Jhula with the availability of things here. You can customize it accordingly. Let's welcome Krishna this Janmashtami. So lets get started.
Ganesh Idol DIY
DIY Charm Rakhi
DIY Felt Rakhi
DIY Pom-Pom Rakhi
Hare Krishna to everyone. On this auspicious festival of Janmashtami may Lord Krishna give you all the things you need in life. Every year I use to celebrate this festival of birth of Lord Krishna. In the night we use to give Jhula to Krishna.
This year I have tried something special with that idea. I thought why not make a Jhula for Bal Gopal at home. Thus came up with Today's post which is a DIY Krishna Jhula. This is my version of Jhula with the availability of things here. You can customize it accordingly. Let's welcome Krishna this Janmashtami. So lets get started.
How to make Krishna Jhula | DIY
Ingredients :-
- Glue Gun / Fevicol
- Two Paper Rolls
- Cutter / Scissors
- Golden Wrapping Paper
- Scotch Tape (Transparent)
- Double Sided Tape
- Cardboard box / Cardboard
- Two cylindrical shaped rollers (I have used paint rollers, you can use any type of roller or big tissue paper roller)
- Decorative Satin Ribbons (I used Red color)
Making Process :-
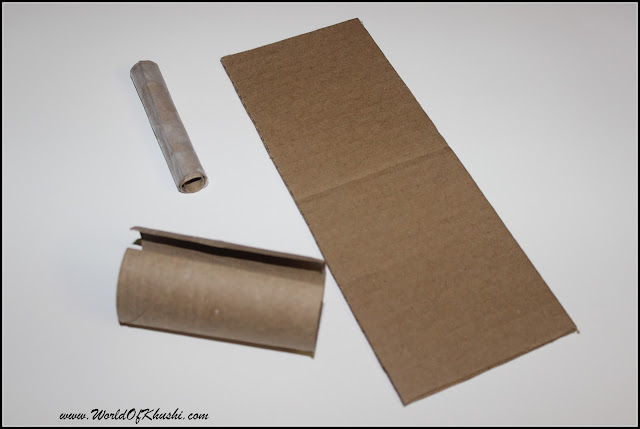
Step 1. Use a paper roll. Cut it with a scissors vertically. Now roll it vertically from one end and once it is completely rolled use a tape at the end.
Step 2. Make 2-3 layers on top of it with a transparent tape.
Step 3. Repeat step 1 & 2 with the other roll. As we need to join one roll with another make sure that there is enough gap to insert one roll into another.
Step 4. Once the rolls are joined use a paper to roll over on top of it. This will make the complete roll symmetrical.
Refer below picture for a complete roll.
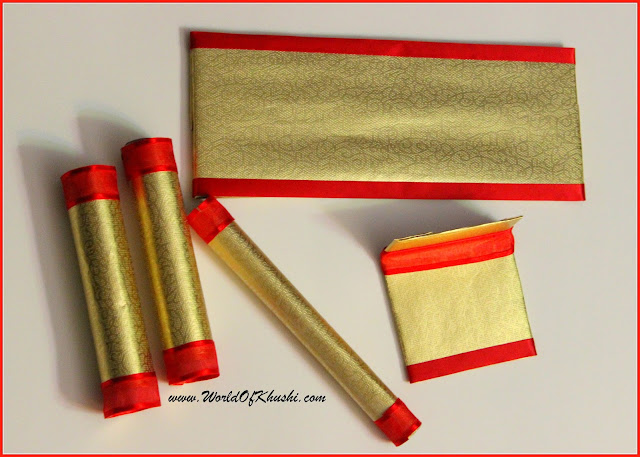
Step 5. Take Golden Wrapper Paper & cut different pieces according to the size of the two cylindrical shaped rollers , big roller which we made in the previous step.
Step 6. Wrap the paper accordingly on the rollers respectively & stick it with glue. Use red ribbon on the ends to make it look more beautiful.
Step 7. Now for the base of Krishna Jhula cut the cardboard in a rectangle shape. Wrap it with the golden paper & red ribbon as shown in the picture.
Step 8. To make the Jhula cut the cardboard according to the desired size. Fold the cardboard & put tape on both sides of the center to that this fold stays hard.
Step 9. Wrap it with Golden Paper & put red ribbon on the fold.
Now its time to start putting all things together.
Step 10. Put the base on a flat table. Use two equal rollers & stick them on the base vertically. Measure the gap between those as we have to keep the large roller on top of them.
Step 11. Once it is stuck properly. Use the large roller & stick it horizontally on top of both the vertical rollers.
Step 12. Take red ribbon. Now we will make the suspension from it. Cut two equal sizes of ribbon so that the jhula should hang at proper length from the roller.
Step 13. Stick the ribbon at the bottom of the Jhula & hang it on the jhula stand which we have made till now. Refer to figure for any doubts.
Step 14. You will be needing one last step for swinging the Jhula. Cut a ribbon of very small length. Stick it to the bottom of the Jhula.
Your own DIY Krishna Jhula is ready. You can customize it according to your choice. Let me know if you make it. Share your creations with me on social media or on my gmail.
Your own DIY Krishna Jhula is ready. You can customize it according to your choice. Let me know if you make it. Share your creations with me on social media or on my gmail.
You may also like :-
DIY Charm Rakhi
DIY Felt Rakhi
DIY Pom-Pom Rakhi
I hope you like this DIY, for more such DIYs stay tuned with Khushi's World. Also like and share this post with your friends and family. Follow me on Khushi's World Facebook Page, Google+ , Instagram and Pinterest for more Posts. I will see you in next post till then take care.


Easy and best way to make the jhula. Will try
ReplyDelete